
How to set up a Second PC with Collsoft
HOW TO SET UP A SECOND PC WITH COLLSOFT
1. DOWNLOAD COLLSOFT PAYROLL ONTO PC
You will download Collsoft Payroll onto the new/second PC. To download the software, please follow the below steps:
1. Go to https://www.collsoft.ie/Downloads
2. Select the relevant year and click on the “download” button.

3. This will start installing on the bottom left of your screen
4. Once it has completed this initial Set-up the Icon will change colour. You can then Right click on the Icon and click on “Open"
5. Windows will prompt you, if you want to allow this application to make changes. You will select “Yes”
6. The InstallShield Wizard will then appear, click on “Next”
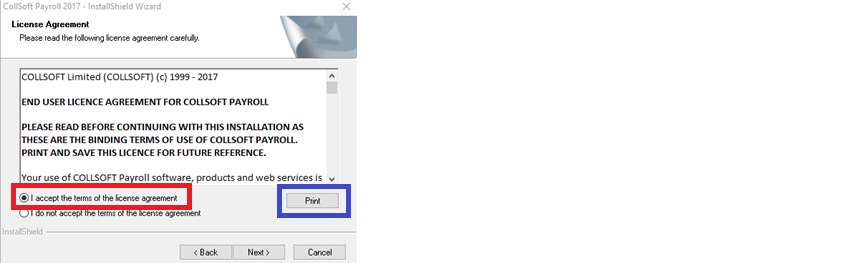
7. You will be presented with the License Agreement. You can print the License agreement should you wish, to keep for your records. Select “I accept the terms of the license agreement” and then click on “Next”
8. The InstallShield Wizard will now complete the installation process.
9. The next Installshield Wizard screen will ask if you want to restart your machine. Click “ No, I will restart my computer later” and then the “Finish” button. If the Payroll has not updated to the latest build, please shut down and restart your PC.
For more a more detailed guide to installing the Payroll click the following link - Installing Collsoft Payroll
2. MOVING YOUR DATA FROM PC ONE TO PC TWO
Once Collsoft Payroll has been Installed onto your second PC, you now need to move your company information across.
- If you selected the C: Drive as your default location, this is done by taking a back-up and restoring that back-up onto the second PC. Please see steps below on this process.
- If you selected the C: Drive as your default location, but realise that this should be a Network Drive, you will need to change your Data Location. Please see steps below on this process.
- If you selected an alternative Network Drive as your location, your Data should be present, if you selected the correct drive.
TAKING AND RESTORING A BACKUP
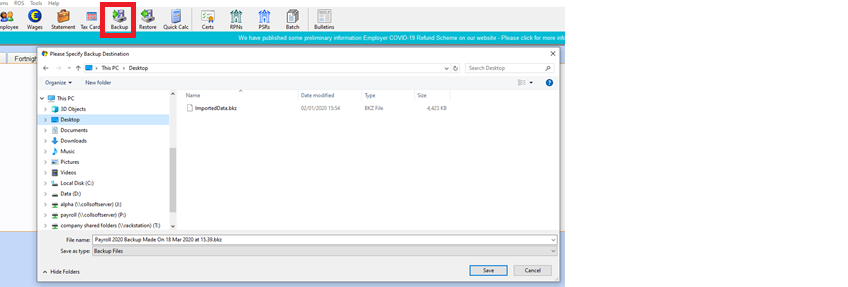
1. Within Collsoft Payroll, please click on the “Backup” button located in the picture tool bar at the top. You can either save this backup to a USB stick or to your desktop (which can then sent via email). Click “Save”
2. Select the companies you wish to take a backup of and the click “backup”. By default, all Companies are flagged for backups.
3. On the second PC, you will Restore this back up. Within Collsoft Payroll, click the “restore” button, located in the picture tool bar at the top. You then need to locate this backup from either your USB stick or where you saved this backup after retrieving it from your email.
4. Then click “open”. Tick the companies you wish to Restore and click “Restore”. By default, all Companies are flagged to be restored.
CHANGING YOUR NETWORK LOCATION
If you incorrectly selected the C: Drive as your default location during the set-up process, you can change the location of your Data to point to the relevant Drive.
Please find a link below to our article on how to network your Payroll.
Networking Your Payroll Data
3. MOVING YOUR ROS CERTIFCATE
You will need to ensure that you have your ROS certificate on the second PC to ensure that Collsoft Payroll and communicate to Revenue. You need this in order for you to retrieve RPN’s and make submission to Revenue.
You can either make a copy of the certificate and save this onto the second PC or you can retrieve your certificate from Revenue’s online services.
RETRIEVING YOUR ROS CERTIFICATE FROM REVENUE
1. Go to www.revenue.ie then Select “ROS”. This will take you to the LOGIN screen

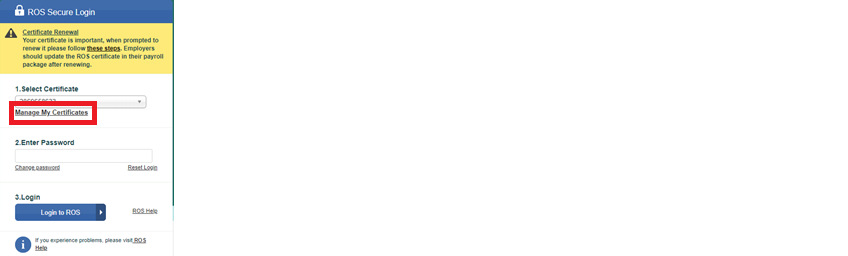
2. On the LOGIN screen, just under your company name, you will see Manage my certificate. Click on this.
3. This will open a new web page. You will be able to locate your certificate/s at the bottom. Then click on the “Save” icon to the right of your certificate.
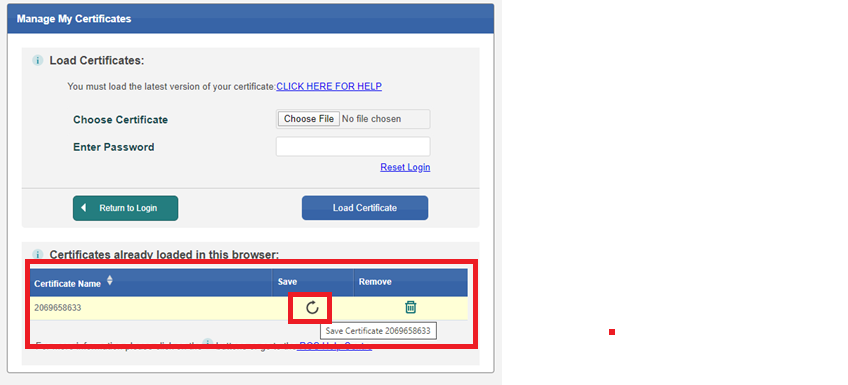
4. A second screen with pop up and you click “save” on this screen. Your ROS certificate will now be located in your downloads folder
5. In Collsoft Payroll, please click on the “Certs” icon in the picture tool bar. You will be presented with the following screen:
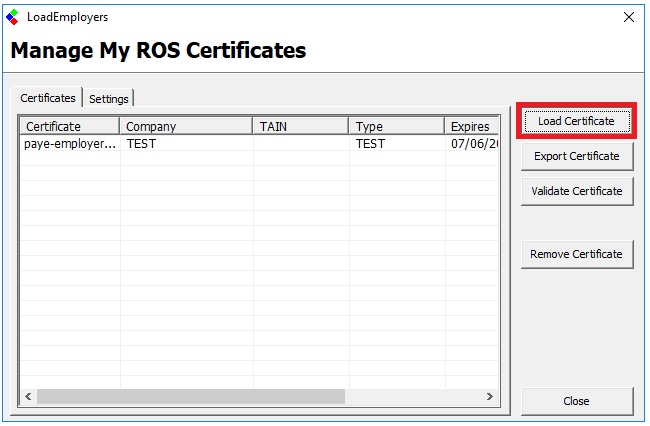
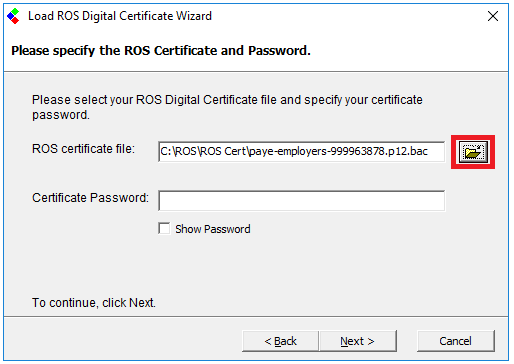
6. Click Load Certificate as shown and a ROS Digital Cert Import Wizard.Click Next and the option to browse for your ROS Cert is available, as shown below.
7. Click on the browse option and locate your ROS Digital Cert on your computer. Your ROS cert will be a .p12 or .bac file. If you recently downloaded it from the ROS website it may be located in the downloads folder.
8. Highlight the Cert and click open.
9. Enter the password you use to Login to ROS,
10. Click Next and the following screen will appear:

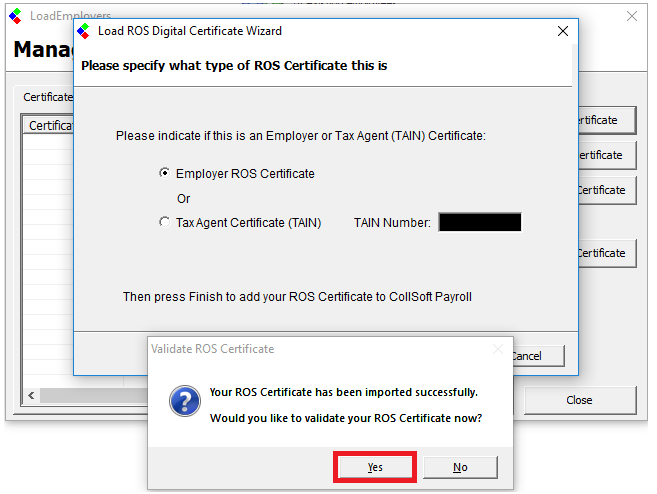
11. If you are using a Tax Agent Cert (TAIN) select this option and enter your TAIN number before clicking Finish. Otherwise, leave the option as Employer ROS Cert and click Finish. The following screen will appear:
12. Click Yes on this message and you can then select the companies you want to validate the cert against.
13. Click on the "validate" button highlighted above and the following screen will appear:
12. Click Yes on this message and you can then select the companies you want to validate the cert against.
13. Click on the "validate" button highlighted above and the following screen will appear:
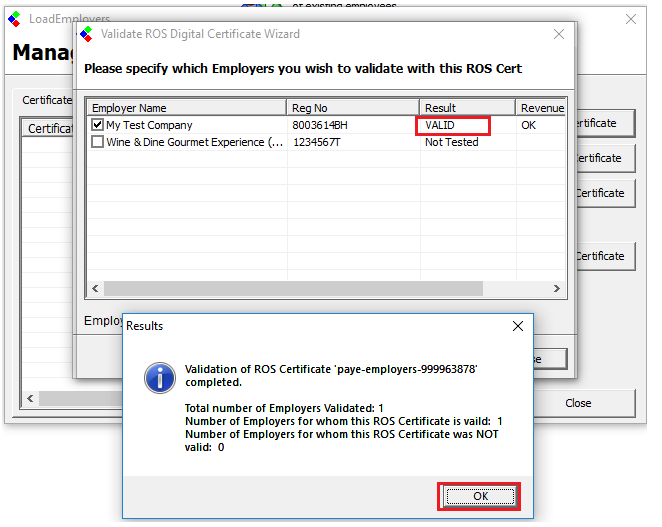
14. Here you can see the result of the validation. If you have a TAIN Cert you will see the Valid result for each of the companies the Cert is valid for.
Click OK, then close. Your ROS digital Cert has now been imported into the Payroll
1. DOWNLOAD COLLSOFT PAYROLL ONTO PC
You will download Collsoft Payroll onto the new/second PC. To download the software, please follow the below steps:
1. Go to https://www.collsoft.ie/Downloads
2. Select the relevant year and click on the “download” button.
3. This will start installing on the bottom left of your screen
4. Once it has completed this initial Set-up the Icon will change colour. You can then Right click on the Icon and click on “Open"
5. Windows will prompt you, if you want to allow this application to make changes. You will select “Yes”
6. The InstallShield Wizard will then appear, click on “Next”
7. You will be presented with the License Agreement. You can print the License agreement should you wish, to keep for your records. Select “I accept the terms of the license agreement” and then click on “Next”
8. The InstallShield Wizard will now complete the installation process.
9. The next Installshield Wizard screen will ask if you want to restart your machine. Click “ No, I will restart my computer later” and then the “Finish” button. If the Payroll has not updated to the latest build, please shut down and restart your PC.
For more a more detailed guide to installing the Payroll click the following link - Installing Collsoft Payroll
2. MOVING YOUR DATA FROM PC ONE TO PC TWO
Once Collsoft Payroll has been Installed onto your second PC, you now need to move your company information across.
- If you selected the C: Drive as your default location, this is done by taking a back-up and restoring that back-up onto the second PC. Please see steps below on this process.
- If you selected the C: Drive as your default location, but realise that this should be a Network Drive, you will need to change your Data Location. Please see steps below on this process.
- If you selected an alternative Network Drive as your location, your Data should be present, if you selected the correct drive.
TAKING AND RESTORING A BACKUP
1. Within Collsoft Payroll, please click on the “Backup” button located in the picture tool bar at the top. You can either save this backup to a USB stick or to your desktop (which can then sent via email). Click “Save”
2. Select the companies you wish to take a backup of and the click “backup”. By default, all Companies are flagged for backups.
3. On the second PC, you will Restore this back up. Within Collsoft Payroll, click the “restore” button, located in the picture tool bar at the top. You then need to locate this backup from either your USB stick or where you saved this backup after retrieving it from your email.
4. Then click “open”. Tick the companies you wish to Restore and click “Restore”. By default, all Companies are flagged to be restored.
CHANGING YOUR NETWORK LOCATION
If you incorrectly selected the C: Drive as your default location during the set-up process, you can change the location of your Data to point to the relevant Drive.
Please find a link below to our article on how to network your Payroll.
Networking Your Payroll Data
3. MOVING YOUR ROS CERTIFCATE
You will need to ensure that you have your ROS certificate on the second PC to ensure that Collsoft Payroll and communicate to Revenue. You need this in order for you to retrieve RPN’s and make submission to Revenue.
You can either make a copy of the certificate and save this onto the second PC or you can retrieve your certificate from Revenue’s online services.
RETRIEVING YOUR ROS CERTIFICATE FROM REVENUE
1. Go to www.revenue.ie then Select “ROS”. This will take you to the LOGIN screen
2. On the LOGIN screen, just under your company name, you will see Manage my certificate. Click on this.
3. This will open a new web page. You will be able to locate your certificate/s at the bottom. Then click on the “Save” icon to the right of your certificate.
4. A second screen with pop up and you click “save” on this screen. Your ROS certificate will now be located in your downloads folder
5. In Collsoft Payroll, please click on the “Certs” icon in the picture tool bar. You will be presented with the following screen:
6. Click Load Certificate as shown and a ROS Digital Cert Import Wizard.Click Next and the option to browse for your ROS Cert is available, as shown below.
7. Click on the browse option and locate your ROS Digital Cert on your computer. Your ROS cert will be a .p12 or .bac file. If you recently downloaded it from the ROS website it may be located in the downloads folder.
8. Highlight the Cert and click open.
9. Enter the password you use to Login to ROS,
10. Click Next and the following screen will appear:
7. Click on the browse option and locate your ROS Digital Cert on your computer. Your ROS cert will be a .p12 or .bac file. If you recently downloaded it from the ROS website it may be located in the downloads folder.
8. Highlight the Cert and click open.
9. Enter the password you use to Login to ROS,
10. Click Next and the following screen will appear:
11. If you are using a Tax Agent Cert (TAIN) select this option and enter your TAIN number before clicking Finish. Otherwise, leave the option as Employer ROS Cert and click Finish. The following screen will appear:
12. Click Yes on this message and you can then select the companies you want to validate the cert against.
13. Click on the "validate" button highlighted above and the following screen will appear:
12. Click Yes on this message and you can then select the companies you want to validate the cert against.
13. Click on the "validate" button highlighted above and the following screen will appear:
14. Here you can see the result of the validation. If you have a TAIN Cert you will see the Valid result for each of the companies the Cert is valid for.
Click OK, then close. Your ROS digital Cert has now been imported into the Payroll
Accept T&C's.png
Accept T&C's.png
Cert is valid.png
Cert is valid.png
Collsoft download.png
Collsoft download.png
Employer screen.png
Employer screen.png
Manage my certificate 2.png
Manage my certificate 2.png
Manage my ROS certificate.png
Manage my ROS certificate.png
ROS logon screen.png
ROS logon screen.png
Save certificate.png
Save certificate.png
search for Ros Cert.png
search for Ros Cert.png
Selecting Drive.png
Selecting Drive.png
Taking a back-up.png
Taking a back-up.png
Validate Ros cert 3.png
Validate Ros cert 3.png
 Get help for this page
