
Sage Line 50 Import
One of the new features added to CollSoft Payroll, is the ability to post your payroll data directly from Payroll into Sage Line 50, whereby you export your payroll data to an intermediary file which is then imported into Sage Line 50.
Before you can export any data from CollSoft Payroll you must define the nominal accounts that the various entries get posted to.
Setting Up Sage Line 50 Link
Before using the Sage Line 50 Nominal interface there are some settings that you must configure in your company. These settings are required so that CollSoft Payroll can post the various transactions associated with a wage to the correct nominal accounts.
Accessing the Sage Line 50 Nominal Settings
To edit the Sage Line 50 Nominal settings for your company you should do the following:
1. Open the Company screen for the company in question.
2. Press the Nominal Settings button on the Misc. tab of the Company screen.
3. You will now see the Nominal Ledger Interface Settings screen. Select the Nominal Mappings Tab.
Sage Line 50 Import: Pay Items Nominal Codes
Nominal Mappings
Before you can export your payroll data to Sage Line 50 you must specify the accounts to which the various costs and liabilities are posted. CollSoft Payroll allows great flexibility in how such items are posted to your accounts. The items that can be exported are categorised as follows:
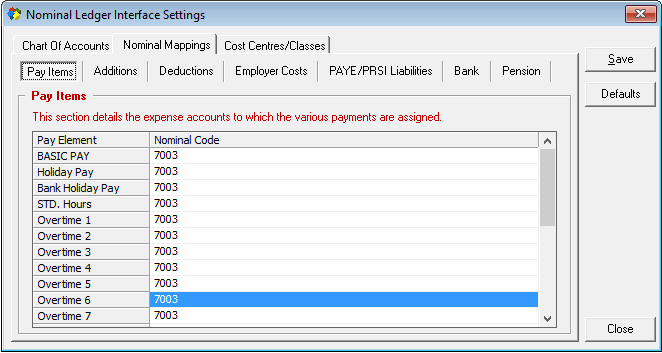
Pay Items
Pay Items include all standard payment types such as Basic Pay, Holiday Pay, Hourly Pay etc. These items would normally be posted to Expense accounts so that they appear in the Profit & Loss report. Each pay item can be posted to either a single or separate accounts depending on the detail that you require for your accounting. Nominal Code 7003 in the above example is the Nominal Code for Staff Salaries in Sage Line 50. Simply type this Nominal code number into the pay element you wish to go to this account.
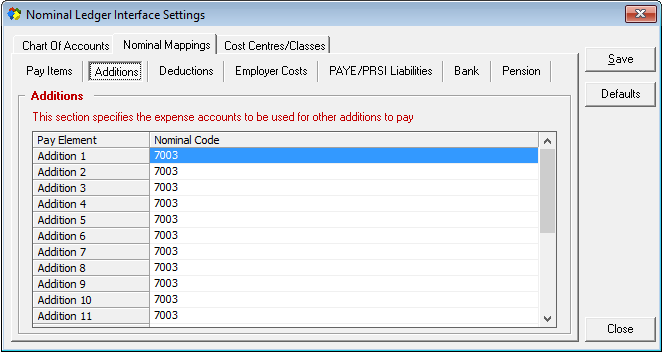
Additions
Additions to pay would usually be posted to expense accounts. This section also includes an entry for BIK Loans to cater for Loans to an employee to cover a shortfall in his/her pay with respect to tax liabilities incurred from Benefit In Kind. Nominal Code 2300 in the below example is the Nominal Code for Long Term Loans in Sage Line 50, so maybe this is where you wish this pay element to be posted to in Sage Line 50.
Sage Line 50 Import: Additions Nominal Codes
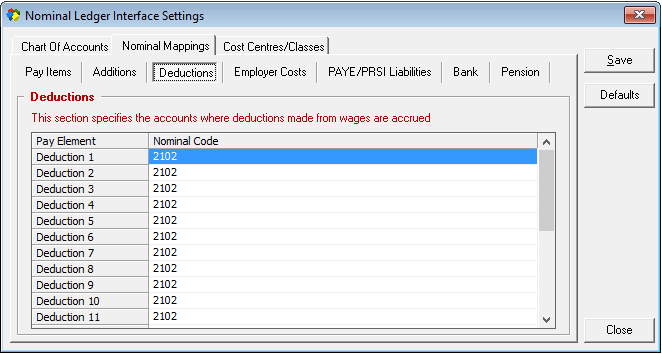
Deductions
This section allows you to specify how deductions (other than PAYE/PRSI) are posted to your accounts. Such deductions would usually (but not always) be assigned to Liability accounts.
Nominal Code 2102 in the below example is the Nominal Code for Other Creditors in Sage Line 50, so maybe this is where you wish this pay element to be posted to in Sage Line 50.
Sage Line 50 Import: Deductions Nominal Codes
Employer Costs
CollSoft Payroll has the facility to accrue other costs that are not directly related to payroll. For example, if an employee has a company car that is costing the employer 500 euro per month in re payments, then this indirect cost can be associated with the employee via Employer Costs. To use employer costs you must specify an account to be debited and an account to be credited. Again Account 7003 is the account that will be debited in Sage Line 50 and Account 2109 is the account that will be credited in Sage Line 50

Sage Line 50 Import: Employer Costs Nominal Codes
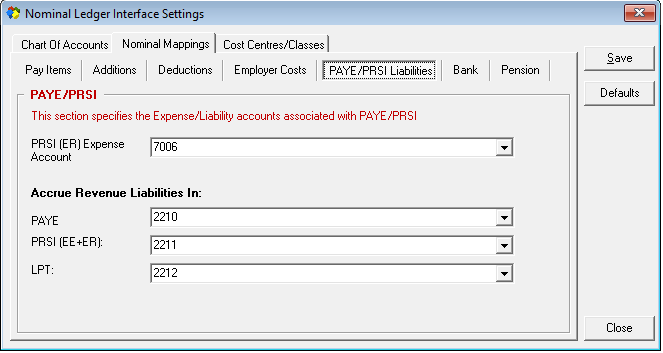
PAYE/PRSI Liabilities
These settings determine where PAYE/PRSI that is deducted from wages are recorded as liabilities due to be paid to Revenue. You must also specify the expense account to which Employers PRSI is charged.
Sage Line 50 Import: PAYE/PRSI Nominal Codes
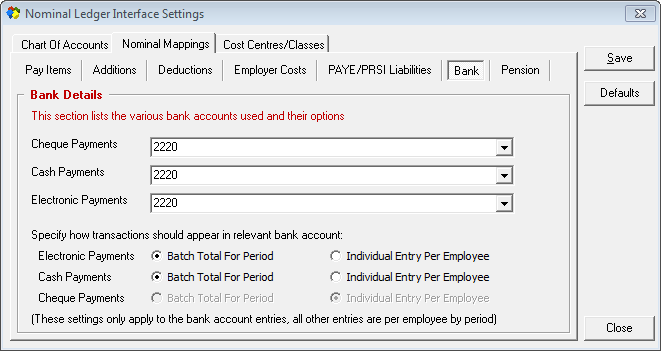
Bank
This section lets you specify the bank accounts that wages are paid from. CollSoft Payroll lets you specify a different bank account for each payment method (Cheque, Cash and Credit Transfer).
For employees that are paid by cash and credit transfer you are also able to specify how the transactions appear in the bank account as follows;
Batch Total For Period: When you choose this option a single entry for the total of all net payments for the period is recorded in the bank account (the expense accounts still show the employee breakdown). This can be useful for bank reconciliation purposes where the bank statement may only show a single entry for a complete weeks wages
Individual Entry Per Employee: When you choose this option then each net payment is recorded separately in the bank account.
Journal entries are created for employees that are paid by cash or credit transfer, while cheques are entered for employees who are paid by cheque. CollSoft Payroll does not allocate cheque numbers, this must be done separately from within Sage Line 50.
Sage Line 50 Import: Bank Nominal Codes
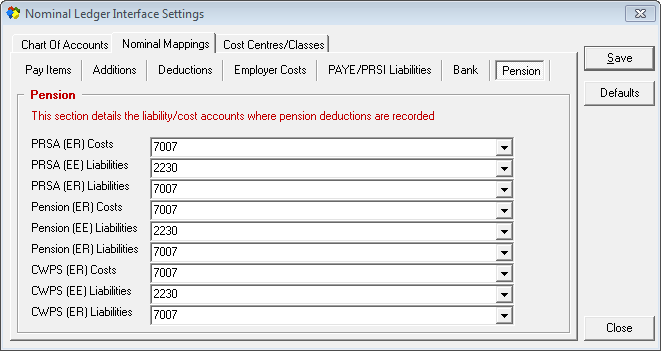
Pension
The pension settings determine the expense accounts to which employer Pension/PRSA contributions are posted and the liability accounts to which pension liabilities are recorded.
Sage Line 50 Import: Pension Nominal Codes
NOTE: It is up to the user to decide what pay elements in Collsoft are to go to what Nominal Accounts in Sage Line 50. The above screen shots are just examples of how a user could setup the Nominal Settings for Sage Line 50
Exporting Your Payroll Data
Step 1 - Backup Your Sage Line 50 Data
Before you do anything else, you should create a backup of your Sage Line 50 data file. This can be done by selecting Back Up from the File menu in Sage Line 50.
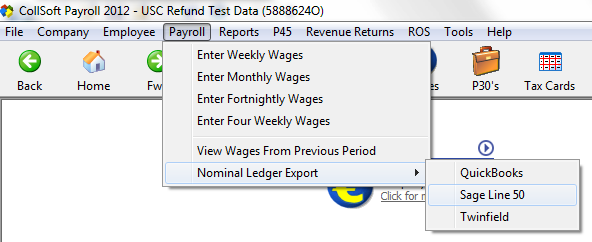
Step 2 - Starting the Nominal Ledger Export In CollSoft Payroll
The process of exporting your Payroll data from CollSoft Payroll is just a matter of running the Nominal Ledger Export Wizard. To run this wizard simply select the Nominal Ledger Export option from the Payroll menu.
Sage Line 50 Import: Select Import Option
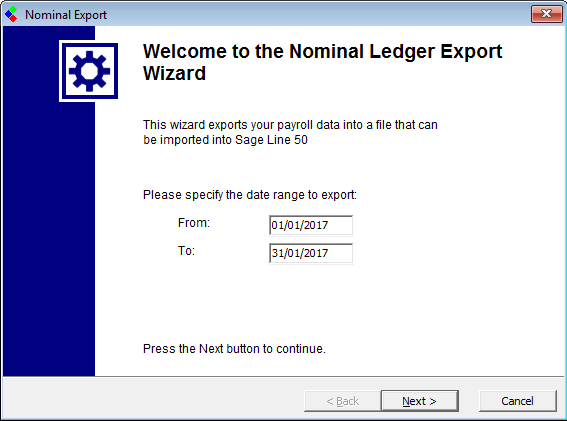
Step 3 - Specify Date Range For Export
This step requires you to specify the dates for the export. All wages (weekly & monthly) between these dates will be included in your export file.
Sage Line 50 Import: Enter Date Range
Note: It is very important that you do not choose dates that overlap with a previous export.
For Example: If you had previously exported all the wages between 1st Jan and 15th Jan, then the next export file should commence on 16th Jan. If you were to run the next export from 15th Jan then there is the possibility that wages on the 15th would be exported into Sage Line 50 twice!
Press the Next button to continue
Step 4 - Specify a Filename for the Export File
Specify a name for the export file, or click on the Browse button to navigate to the desired location.
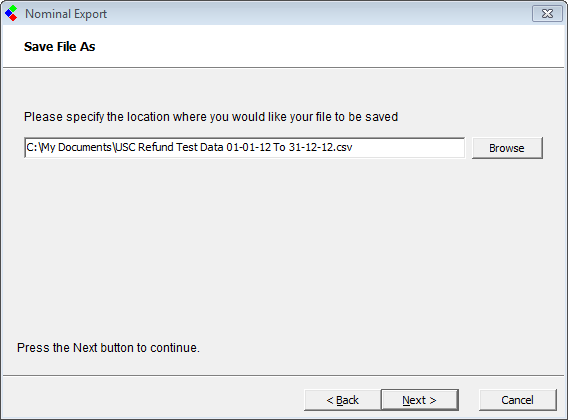
Sage Line 50 Import: Save File Location
Press the Next button to continue. CollSoft Payroll will now process all the wages between the dates that you specified.
If the export process was successful you will be asked if you want to view a report of the postings. This report shows you a summary of the amounts
posted to each account, and a detailed breakdown on a wage by wage basis of the individual transaction involved.
Press the Finish button to close the wizard.
You are now ready to import your Payroll data into Sage Line 50.
Errors That Can Occur
If for any reason CollSoft is not able to export your payroll data then you will be shown a list of errors at the end of the wizard (and your export file will not be created).
The most common reason for an export to fail is that there is an amount associated with a category that has not been mapped to a nominal account in your company settings.
For example, if you do not specify a bank account in your nominal settings then Payroll will be unable to post the net payments to each employee, and you will see a screen similar to the following:

Sage Line 50 Import: Error Log
To rectify this problem review your nominal settings and try the export wizard again.
Importing Your Payroll Data Into Sage Line 50
Step 1 - Export Payroll Data
Export your Payroll data from CollSoft Payroll as described above.
Step 2 - Start Sage Line 50
Open Sage Line 50 and make a backup of your existing accounts data. (Select Back Up from the File menu)
Step 3 - Check Your Data
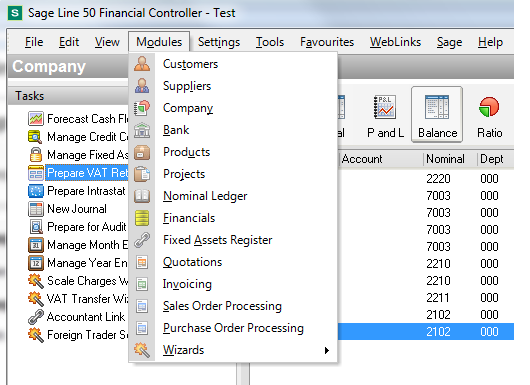
Print a trial balance report in Sage Line 50 by selecting Financials from the Modules drop down menu and then selecting the Balance button, choosing the appropriate dates.
Sage Line 50 Import: Print Trial Balance
Step 4 - Importing The Payroll Data
Select the Import option from the File drop down menu in Sage Line 50. This will open the File Import screen.
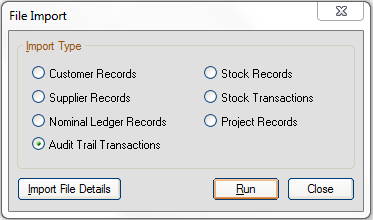
Sage Line 50 Import: Import File
Select the Audit Trial Transactions option and click run.
You must then select the file you exported from Collsoft Payroll and click on the Open button. The Import will run through and you will be present with a summary of the import as shown below.
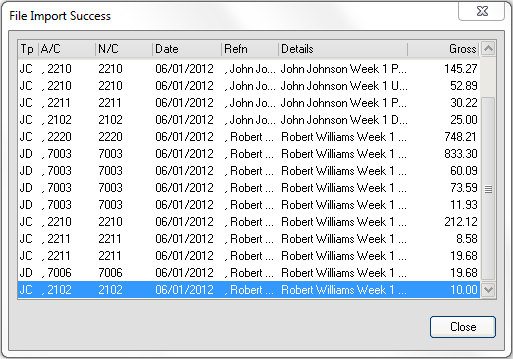
Sage Line 50 Import: File Import Results
Step 5 - Check The Postings
Re-run the Trial Balance report in Sage Line 50. The difference between this trial balance and the one from step 3 should be accounted for by the summary of transactions reported at the end of the export process in CollSoft Payroll. The individual splits from each wage entry can be seen by double clicking on the relevant entry in your Nominal Accounts in Sage Line 50, or by drilling down in the various reports in Sage Line 50.
Before you can export any data from CollSoft Payroll you must define the nominal accounts that the various entries get posted to.
Setting Up Sage Line 50 Link
Before using the Sage Line 50 Nominal interface there are some settings that you must configure in your company. These settings are required so that CollSoft Payroll can post the various transactions associated with a wage to the correct nominal accounts.
Accessing the Sage Line 50 Nominal Settings
To edit the Sage Line 50 Nominal settings for your company you should do the following:
1. Open the Company screen for the company in question.
2. Press the Nominal Settings button on the Misc. tab of the Company screen.
3. You will now see the Nominal Ledger Interface Settings screen. Select the Nominal Mappings Tab.
Sage Line 50 Import: Pay Items Nominal Codes
Nominal Mappings
Before you can export your payroll data to Sage Line 50 you must specify the accounts to which the various costs and liabilities are posted. CollSoft Payroll allows great flexibility in how such items are posted to your accounts. The items that can be exported are categorised as follows:
Pay Items
Pay Items include all standard payment types such as Basic Pay, Holiday Pay, Hourly Pay etc. These items would normally be posted to Expense accounts so that they appear in the Profit & Loss report. Each pay item can be posted to either a single or separate accounts depending on the detail that you require for your accounting. Nominal Code 7003 in the above example is the Nominal Code for Staff Salaries in Sage Line 50. Simply type this Nominal code number into the pay element you wish to go to this account.
Additions
Additions to pay would usually be posted to expense accounts. This section also includes an entry for BIK Loans to cater for Loans to an employee to cover a shortfall in his/her pay with respect to tax liabilities incurred from Benefit In Kind. Nominal Code 2300 in the below example is the Nominal Code for Long Term Loans in Sage Line 50, so maybe this is where you wish this pay element to be posted to in Sage Line 50.
Sage Line 50 Import: Additions Nominal Codes
Deductions
This section allows you to specify how deductions (other than PAYE/PRSI) are posted to your accounts. Such deductions would usually (but not always) be assigned to Liability accounts.
Nominal Code 2102 in the below example is the Nominal Code for Other Creditors in Sage Line 50, so maybe this is where you wish this pay element to be posted to in Sage Line 50.
Sage Line 50 Import: Deductions Nominal Codes
Employer Costs
CollSoft Payroll has the facility to accrue other costs that are not directly related to payroll. For example, if an employee has a company car that is costing the employer 500 euro per month in re payments, then this indirect cost can be associated with the employee via Employer Costs. To use employer costs you must specify an account to be debited and an account to be credited. Again Account 7003 is the account that will be debited in Sage Line 50 and Account 2109 is the account that will be credited in Sage Line 50
Sage Line 50 Import: Employer Costs Nominal Codes
PAYE/PRSI Liabilities
These settings determine where PAYE/PRSI that is deducted from wages are recorded as liabilities due to be paid to Revenue. You must also specify the expense account to which Employers PRSI is charged.
Sage Line 50 Import: PAYE/PRSI Nominal Codes
Bank
This section lets you specify the bank accounts that wages are paid from. CollSoft Payroll lets you specify a different bank account for each payment method (Cheque, Cash and Credit Transfer).
For employees that are paid by cash and credit transfer you are also able to specify how the transactions appear in the bank account as follows;
Batch Total For Period: When you choose this option a single entry for the total of all net payments for the period is recorded in the bank account (the expense accounts still show the employee breakdown). This can be useful for bank reconciliation purposes where the bank statement may only show a single entry for a complete weeks wages
Individual Entry Per Employee: When you choose this option then each net payment is recorded separately in the bank account.
Journal entries are created for employees that are paid by cash or credit transfer, while cheques are entered for employees who are paid by cheque. CollSoft Payroll does not allocate cheque numbers, this must be done separately from within Sage Line 50.
Sage Line 50 Import: Bank Nominal Codes
Pension
The pension settings determine the expense accounts to which employer Pension/PRSA contributions are posted and the liability accounts to which pension liabilities are recorded.
Sage Line 50 Import: Pension Nominal Codes
NOTE: It is up to the user to decide what pay elements in Collsoft are to go to what Nominal Accounts in Sage Line 50. The above screen shots are just examples of how a user could setup the Nominal Settings for Sage Line 50
Exporting Your Payroll Data
Step 1 - Backup Your Sage Line 50 Data
Before you do anything else, you should create a backup of your Sage Line 50 data file. This can be done by selecting Back Up from the File menu in Sage Line 50.
Step 2 - Starting the Nominal Ledger Export In CollSoft Payroll
The process of exporting your Payroll data from CollSoft Payroll is just a matter of running the Nominal Ledger Export Wizard. To run this wizard simply select the Nominal Ledger Export option from the Payroll menu.
Sage Line 50 Import: Select Import Option
Step 3 - Specify Date Range For Export
This step requires you to specify the dates for the export. All wages (weekly & monthly) between these dates will be included in your export file.
Sage Line 50 Import: Enter Date Range
Note: It is very important that you do not choose dates that overlap with a previous export.
For Example: If you had previously exported all the wages between 1st Jan and 15th Jan, then the next export file should commence on 16th Jan. If you were to run the next export from 15th Jan then there is the possibility that wages on the 15th would be exported into Sage Line 50 twice!
Press the Next button to continue
Step 4 - Specify a Filename for the Export File
Specify a name for the export file, or click on the Browse button to navigate to the desired location.
Sage Line 50 Import: Save File Location
Press the Next button to continue. CollSoft Payroll will now process all the wages between the dates that you specified.
If the export process was successful you will be asked if you want to view a report of the postings. This report shows you a summary of the amounts
posted to each account, and a detailed breakdown on a wage by wage basis of the individual transaction involved.
Press the Finish button to close the wizard.
You are now ready to import your Payroll data into Sage Line 50.
Errors That Can Occur
If for any reason CollSoft is not able to export your payroll data then you will be shown a list of errors at the end of the wizard (and your export file will not be created).
The most common reason for an export to fail is that there is an amount associated with a category that has not been mapped to a nominal account in your company settings.
For example, if you do not specify a bank account in your nominal settings then Payroll will be unable to post the net payments to each employee, and you will see a screen similar to the following:
Sage Line 50 Import: Error Log
To rectify this problem review your nominal settings and try the export wizard again.
Importing Your Payroll Data Into Sage Line 50
Step 1 - Export Payroll Data
Export your Payroll data from CollSoft Payroll as described above.
Step 2 - Start Sage Line 50
Open Sage Line 50 and make a backup of your existing accounts data. (Select Back Up from the File menu)
Step 3 - Check Your Data
Print a trial balance report in Sage Line 50 by selecting Financials from the Modules drop down menu and then selecting the Balance button, choosing the appropriate dates.
Sage Line 50 Import: Print Trial Balance
Step 4 - Importing The Payroll Data
Select the Import option from the File drop down menu in Sage Line 50. This will open the File Import screen.
Sage Line 50 Import: Import File
Select the Audit Trial Transactions option and click run.
You must then select the file you exported from Collsoft Payroll and click on the Open button. The Import will run through and you will be present with a summary of the import as shown below.
Sage Line 50 Import: File Import Results
Step 5 - Check The Postings
Re-run the Trial Balance report in Sage Line 50. The difference between this trial balance and the one from step 3 should be accounted for by the summary of transactions reported at the end of the export process in CollSoft Payroll. The individual splits from each wage entry can be seen by double clicking on the relevant entry in your Nominal Accounts in Sage Line 50, or by drilling down in the various reports in Sage Line 50.
Additions Nominal Codes.png
Additions Nominal Codes.png
Bank Nominal Codes.png
Bank Nominal Codes.png
Deductions Nominal Codes.png
Deductions Nominal Codes.png
Employer Costs Nominal Codes.png
Employer Costs Nominal Codes.png
Error Log.png
Error Log.png
Exporting your Payroll Data.png
Exporting your Payroll Data.png
Import Payroll Data.png
Import Payroll Data.png
Import Summary.png
Import Summary.png
Nominal Ledger Export Wizard.png
Nominal Ledger Export Wizard.png
Pay Items Nominal Codes.png
Pay Items Nominal Codes.png
PAYEPRSI Nominal Codes.png
PAYEPRSI Nominal Codes.png
Pension Nominal Codes.png
Pension Nominal Codes.png
Save File Path.png
Save File Path.png
Select Date Range.png
Select Date Range.png
Select Import Option.png
Select Import Option.png
Trial Balance Print.png
Trial Balance Print.png
 Get help for this page
