
Importing Wage Data
CollSoft Payroll has an import function to import wage data from a range of sources including:
1. Microsoft Excel spreadsheets
2. Timecard Systems
3. CSV text files
4. Tab delimited text files
Creating the Import File
The easiest way to create an import file is to use Microsoft Excel. Simply open excel and create a new spreadsheet. The basic fields you will need for each employee you are importing wage information for, are Name, Works No. You must enter then into the spreadsheet as shown below. The rest of the columns are made up of the wage information that you wish to import.

Importing Wage Data: Sample Import File
Some Timecard/Clockin system are capable of exporting wage data to a CSV file. You will need to edit this data to the format above before you can import it into the Payroll Software.
Once you have created the spreadsheet, you can then save it as a .csv file or a .xls file. Both file types can be imported into Collsoft Payroll Software. Now that you have created and saved the spreadsheet you can do the import.
Importing Wage Data Wizard
The first step to importing payroll data into CollSoft Payroll is to open up the wage period (weekly or monthly) into which you would like the data imported, then press the Import button.
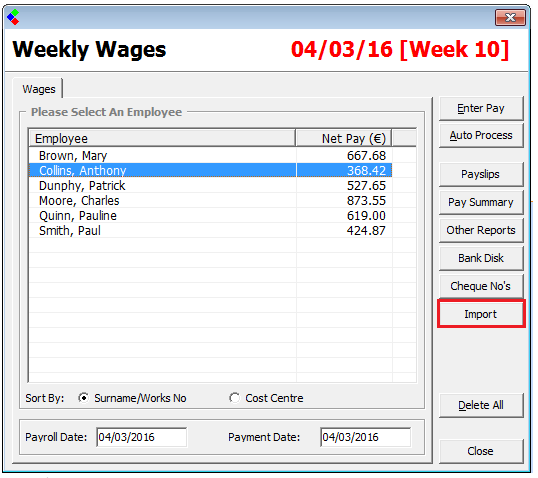 Importing Wage Data: Import Button
The import wizard will now guide you through the importation process
Select File to be Imported
You must specify the file that you would like to import. Simply press the Browse button, and navigate to the particular file that is to be imported, then press Open.
If you are importing an Excel spreadsheet then a Combo box listing all of the worksheets in the file will be displayed. Select the sheet that contains your data.
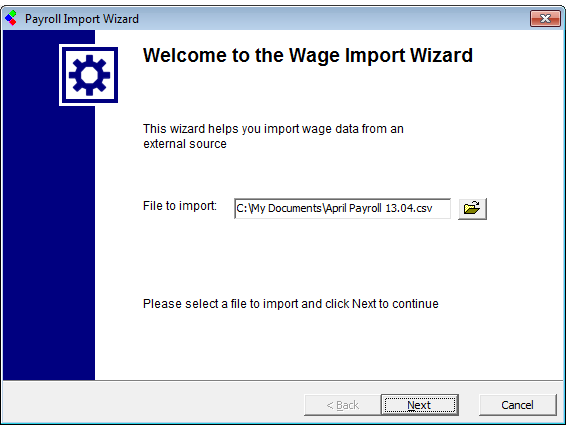
Importing Wage Data: Select File to be Imported
Press Next > to continue.
View Data
You will now see the data from your import file presented as follows:
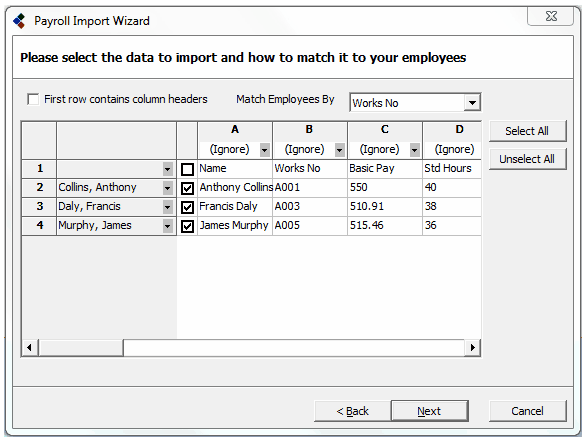
Importing Wage Data: Data from Import File Displayed
As you can see, the columns are labelled by the letters of the alphabet (similar to Microsoft Excel). If the first row of your data contains a list of field headers (as the sample shown does), then click on the First Row Contains Column Headers tick box. Your data will be re-arranged as to show these field headers as the column headers:
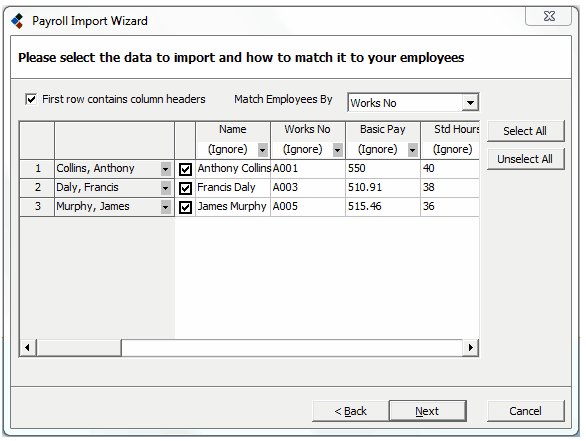
Importing Wage Data: Remove first row Headers
Click Next to continue.
The next step is to identify the data contained in each column. Under each column header in the report there is a combo box (drop down list) containing a list of the fields that CollSoft Payroll recognises. Select a field to map each relevant column to. N.B. It is not necessary to map each column - only the columns that you wish to import.
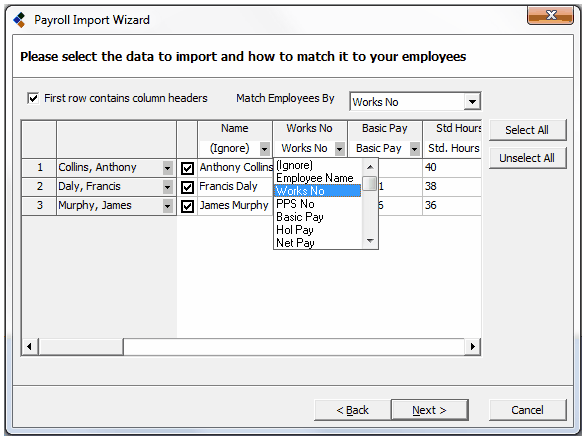
Importing Wage Data: Indicate to payroll what each column represents
Click Next > to continue
When you have specified the data that is in each column you need to match the rows to employees in your company. This can be done either manually by selecting an employee from the combo boxes in the second column, or it can be done automatically by specifying the criteria used to match to your employees.
Employees can be matched by Name, PPS number or Works Number. To select the criteria that should be used simply select one of the options from the 'Match Employee By' combo box. The Import Wizard will then attempt to match the data contained in your file to your employees. You will need to scroll down through the list of employees and make sure that each row is assigned to a specific employee. If you find a row that isn't assigned you can assigned it manually before running the import.
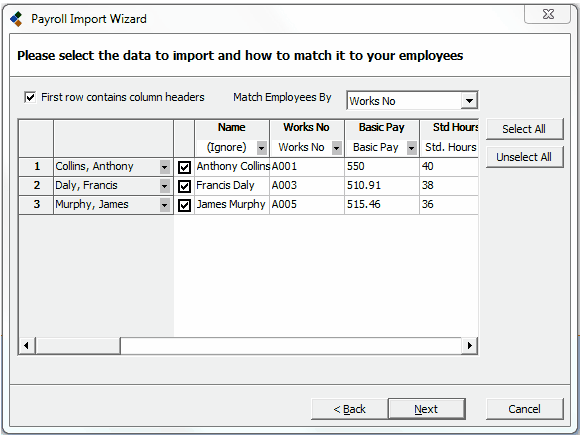
Importing Wage Data: Data ready to be imported
Press Next to continue
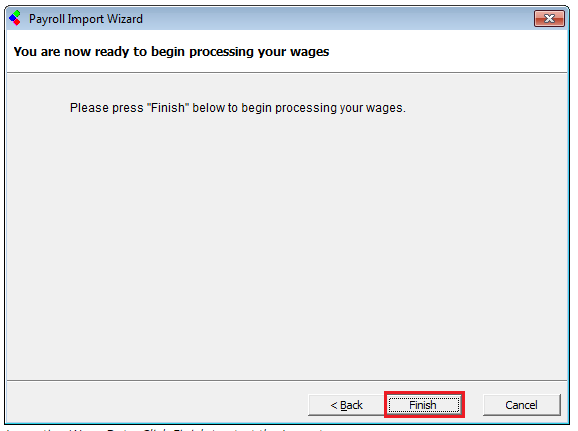
Importing Wage Data: Click Finish to start the Import
Click on the Finish button and the import will begin. When the import is finished you will receive a message stating that the import is complete and the payroll will tell you how many wages have been imported and processed.
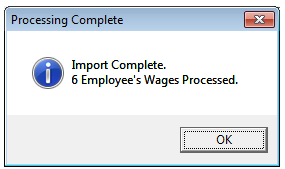
Importing Wage Data: Import Complete
Note: Be sure to check that these wages have been processed correctly and that the correct information has been imported into the correct location. Do not assume that just because the import is finished that the wages have been processed correctly.
1. Microsoft Excel spreadsheets
2. Timecard Systems
3. CSV text files
4. Tab delimited text files
Creating the Import File
The easiest way to create an import file is to use Microsoft Excel. Simply open excel and create a new spreadsheet. The basic fields you will need for each employee you are importing wage information for, are Name, Works No. You must enter then into the spreadsheet as shown below. The rest of the columns are made up of the wage information that you wish to import.
Importing Wage Data: Sample Import File
Some Timecard/Clockin system are capable of exporting wage data to a CSV file. You will need to edit this data to the format above before you can import it into the Payroll Software.
Once you have created the spreadsheet, you can then save it as a .csv file or a .xls file. Both file types can be imported into Collsoft Payroll Software. Now that you have created and saved the spreadsheet you can do the import.
Importing Wage Data Wizard
The first step to importing payroll data into CollSoft Payroll is to open up the wage period (weekly or monthly) into which you would like the data imported, then press the Import button.
The import wizard will now guide you through the importation process
Select File to be Imported
You must specify the file that you would like to import. Simply press the Browse button, and navigate to the particular file that is to be imported, then press Open.
If you are importing an Excel spreadsheet then a Combo box listing all of the worksheets in the file will be displayed. Select the sheet that contains your data.
Importing Wage Data: Select File to be Imported
Press Next > to continue.
View Data
You will now see the data from your import file presented as follows:
Importing Wage Data: Data from Import File Displayed
As you can see, the columns are labelled by the letters of the alphabet (similar to Microsoft Excel). If the first row of your data contains a list of field headers (as the sample shown does), then click on the First Row Contains Column Headers tick box. Your data will be re-arranged as to show these field headers as the column headers:
Importing Wage Data: Remove first row Headers
Click Next to continue.
The next step is to identify the data contained in each column. Under each column header in the report there is a combo box (drop down list) containing a list of the fields that CollSoft Payroll recognises. Select a field to map each relevant column to. N.B. It is not necessary to map each column - only the columns that you wish to import.
Importing Wage Data: Indicate to payroll what each column represents
Click Next > to continue
When you have specified the data that is in each column you need to match the rows to employees in your company. This can be done either manually by selecting an employee from the combo boxes in the second column, or it can be done automatically by specifying the criteria used to match to your employees.
Employees can be matched by Name, PPS number or Works Number. To select the criteria that should be used simply select one of the options from the 'Match Employee By' combo box. The Import Wizard will then attempt to match the data contained in your file to your employees. You will need to scroll down through the list of employees and make sure that each row is assigned to a specific employee. If you find a row that isn't assigned you can assigned it manually before running the import.
Importing Wage Data: Data ready to be imported
Press Next to continue
Importing Wage Data: Click Finish to start the Import
Click on the Finish button and the import will begin. When the import is finished you will receive a message stating that the import is complete and the payroll will tell you how many wages have been imported and processed.
Importing Wage Data: Import Complete
Note: Be sure to check that these wages have been processed correctly and that the correct information has been imported into the correct location. Do not assume that just because the import is finished that the wages have been processed correctly.
Data ready to Import.png
Data ready to Import.png
Import Button.png
Import Button.png
Import Complete.png
Import Complete.png
Import Complete.png
Import Complete.png
Import Data.png
Import Data.png
Import File Select.png
Import File Select.png
Import File Select.png
Import File Select.png
Importing Finish Button.png
Importing Finish Button.png
Importing Wage Data- Click Finish.png
Importing Wage Data- Click Finish.png
Importing Wage Data- Data ready to be Imported.png
Importing Wage Data- Data ready to be Imported.png
Importing Wage Data- DAte from Import File Displayed.png
Importing Wage Data- DAte from Import File Displayed.png
Importing Wage Data- DREmove first Row Headers.png
Importing Wage Data- DREmove first Row Headers.png
Importing Wage Data Import Button.png
Importing Wage Data Import Button.png
Importing Wage Data- Import Complete.png
Importing Wage Data- Import Complete.png
Importing Wage Data- Indicate to Payroll.png
Importing Wage Data- Indicate to Payroll.png
Importing Wage Data ISelect File to be imported.png
Importing Wage Data ISelect File to be imported.png
Importing Wage Data.png
Importing Wage Data.png
Match Import Data.png
Match Import Data.png
Remove Column Headers.png
Remove Column Headers.png
Sample Import File.png
Sample Import File.png
 Get help for this page
