General Concepts
CollSoft Payroll fulfils the payroll requirements of all employer status; sole traders, partnerships, as well as limited companies. Hereafter, all employers will be referred to as Company regardless of their status.
Step 1
Create New Company
In CollSoft Payroll, everything begins with a Company. You must create a Company before you can commence setting up employees and/or processing payroll.
In creating a Company you must set the master details by which the Company will operate payroll as a whole, for example, the normal business address of the employer, the bank account from which payroll will be paid, the standard set of additions and deductions, the varying cost centres (if any) etc.
At any time the company settings can be amended/updated by returning to the Company menu. At each employee level, these company level settings can be amended to suit the particular employee payroll requirements.
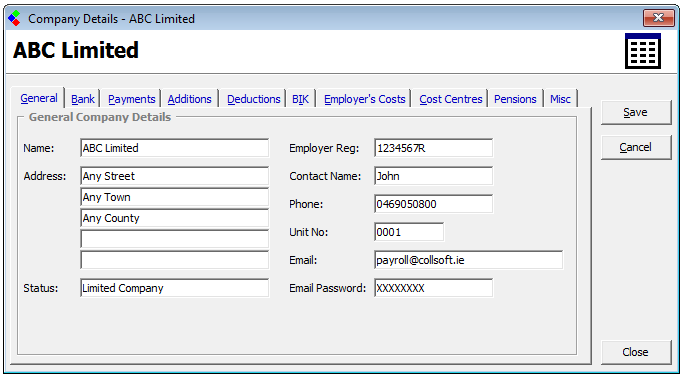
General Concepts: Add a new Company/Employer
Step 2
Add New Employee
Once the Company has been setup each employee record can be created. An employee record must be created before any payroll can be processed for that employee through CollSoft Payroll. An employee record can be amended at any time, for example, to update Revenue Details (tax credits, SRCOP, USC), change payment method, setup payslip email options etc.
The timing of employee amendments is very important to the correct operation of payroll. Employee amendments must be made prior to processing payroll for the period to which the changes must be effective from. Any changes made to an employee record will not effect previous pay periods which have already processed.
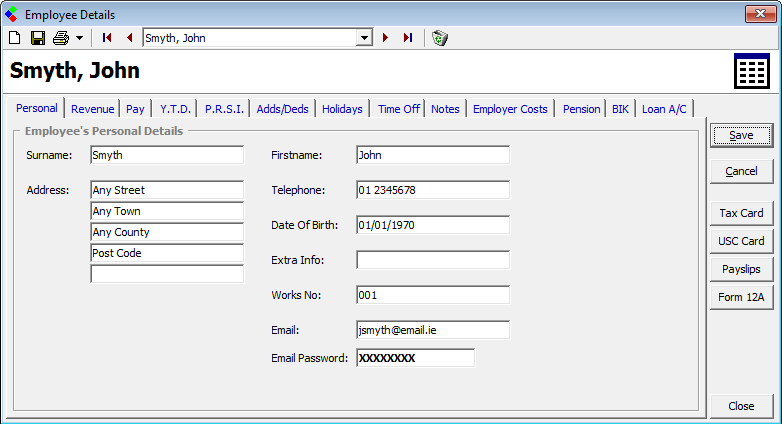
General Concepts: Setting up a new Employee
Step 3
Processing Payroll
Once the Company has been created and all employees have been added, the payroll or wages can be processed.
It is important that the initial pay period is set up correctly as this will affect each subsequent pay period and may create an issue at the end of the tax year if set incorrectly in the initial period.
‘Tax must be deducted or refunded in accordance with the tax credits and standard rate cut-off point due and the tax rate applicable at the time the payment is made. This is so even if all or part of it was earned or treated as earned in a previous or coming income tax year.’ Excerpt from Revenue Guide to Employers
Select the first normal pay day (as it would usually be) for the first payment in the payroll year. This must be the actual day of payment and not when the work was carried out.
‘Weekly pay should be regarded as paid on the same weekday throughout the year. For example, where the normal pay day is on a Friday but one pay day is changed to the previous Thursday, the following day (Friday) should still be regarded as the pay day for the purpose of determining the income tax week.’ Excerpt from Revenue Guide to Employers
Choose the income tax week in which the initial payment will be made. This must be the actual day of payment and not when the work was carried out. Refer to Revenue Tax Weeks and Months
CollSoft will automatically align the day and tax week entered to the appropriate income tax week based on the above week day and date entered.
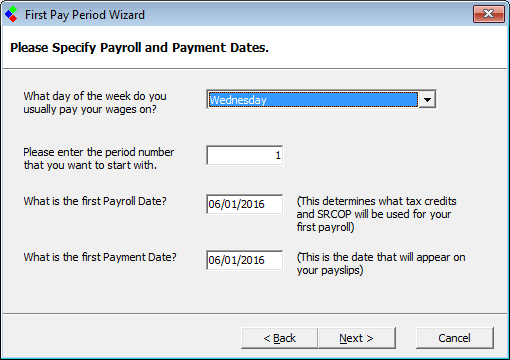
General Concepts: Setting up the first pay period
Once the initial pay period is set, the first pay period will list the employees to be processed for that period.
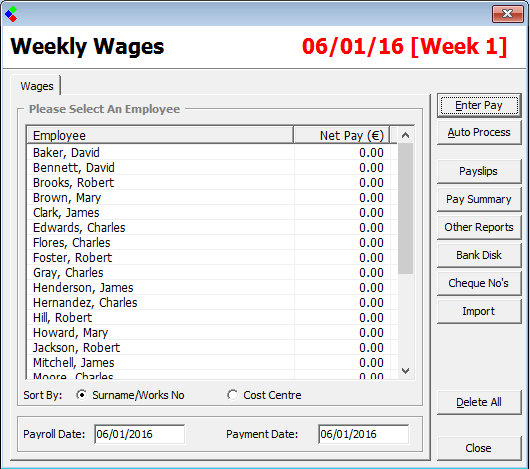
General Concepts: Employee listing for the open pay period
Each employee's wage record is set to zero. You now have two options;
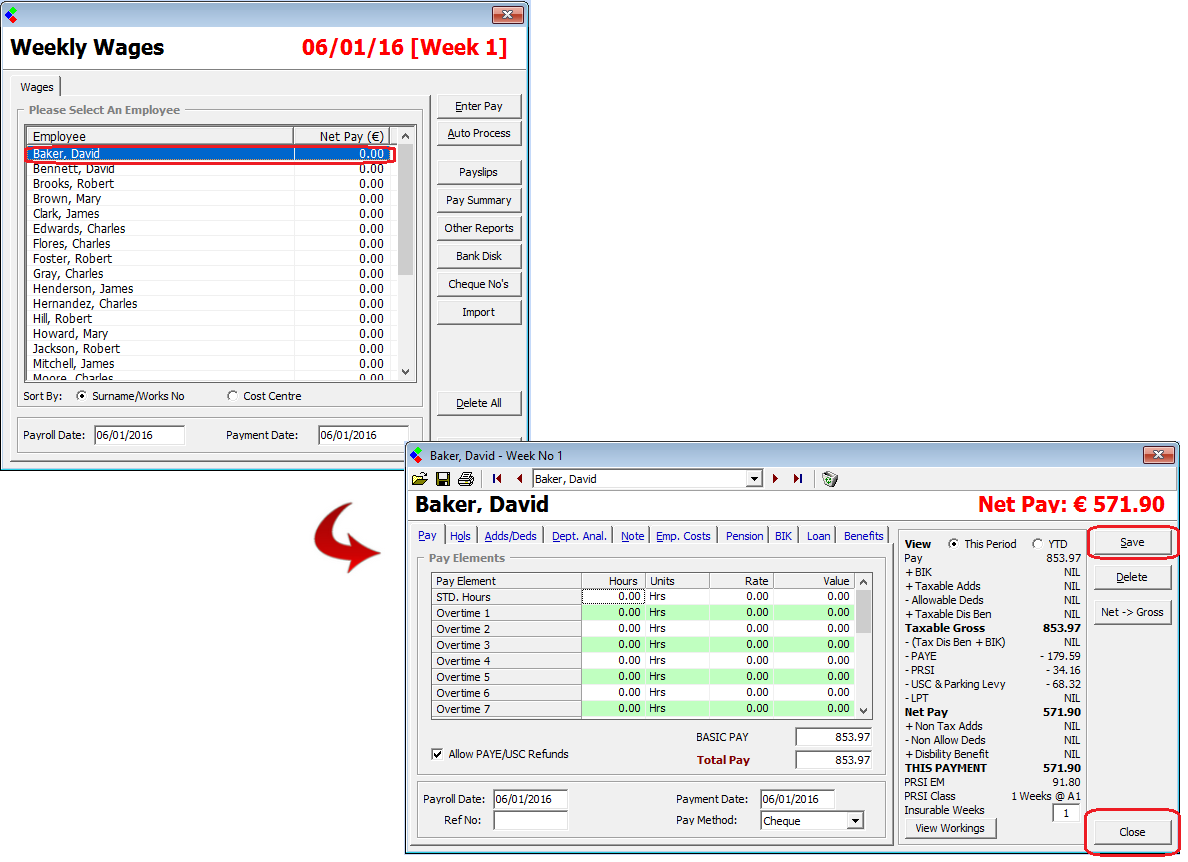
1. Enter the wage details within the open pay period
2. Auto-Process to copy forward the previous pay period payroll into the current pay period.
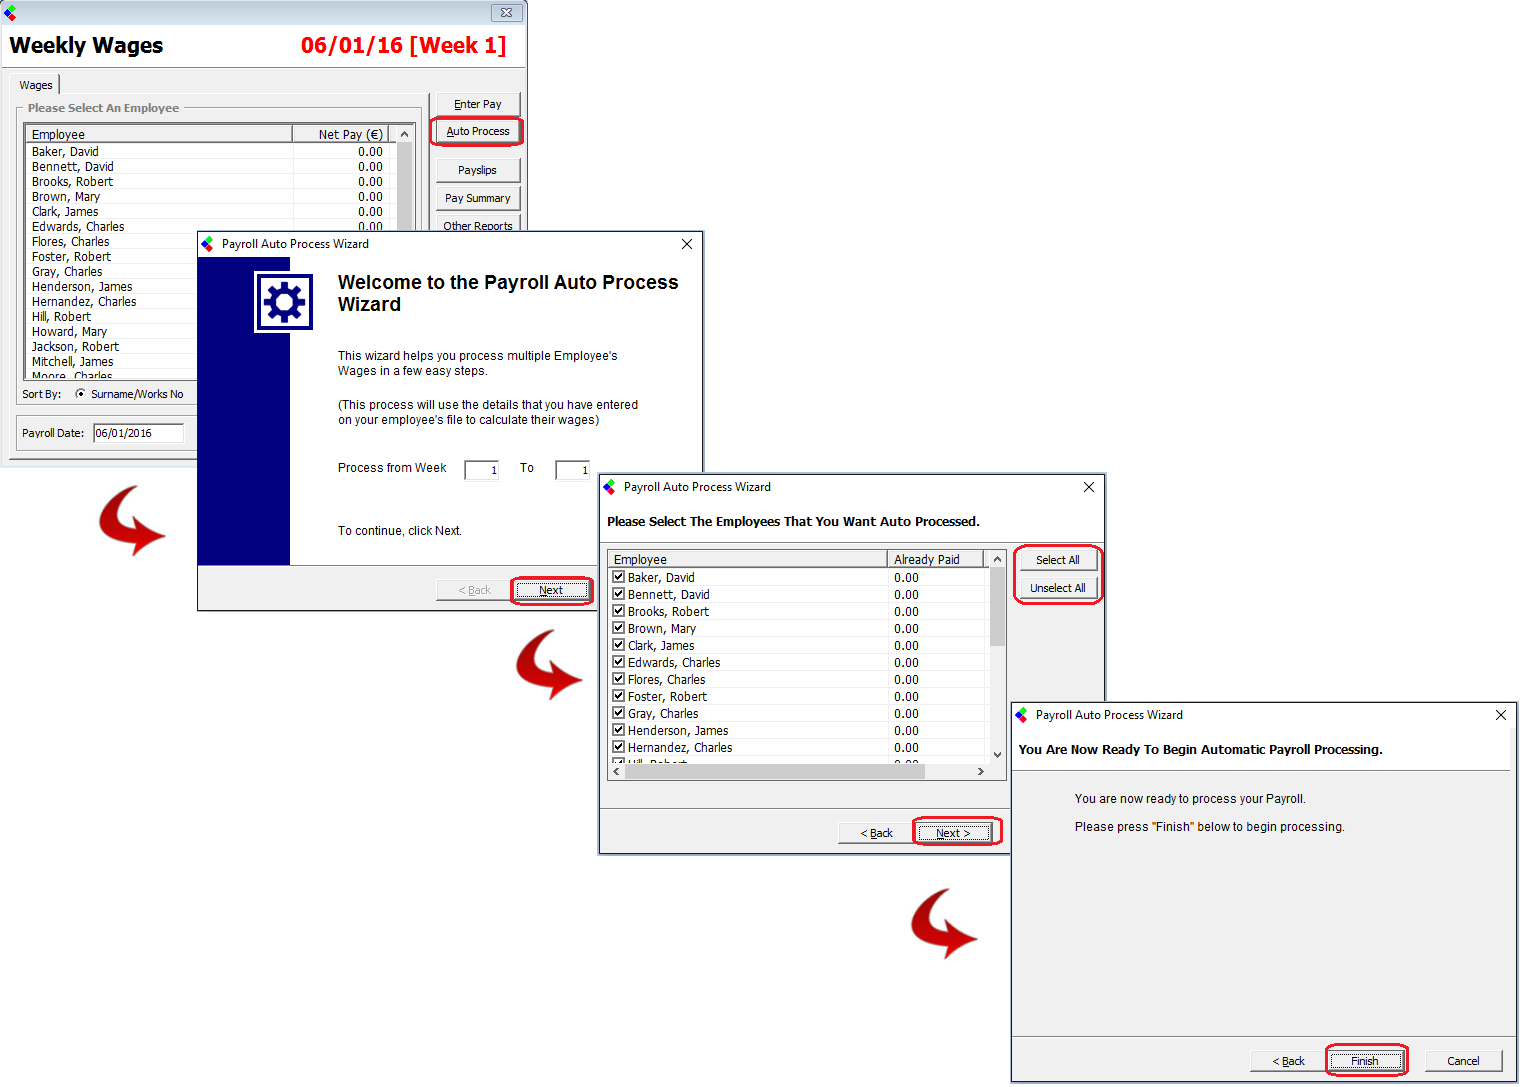
CollSoft Payroll offers a batch processing option called Auto Process. This function will process all the employee records in a batch, copying the payroll details processed in the previous pay period and applying them to the current pay period. For exceptions, it is possible to simply amend the individual employee payroll details for the period by simply selecting the employee from the listing (as detailed in Step 1 above), prior to selecting to Auto Process.
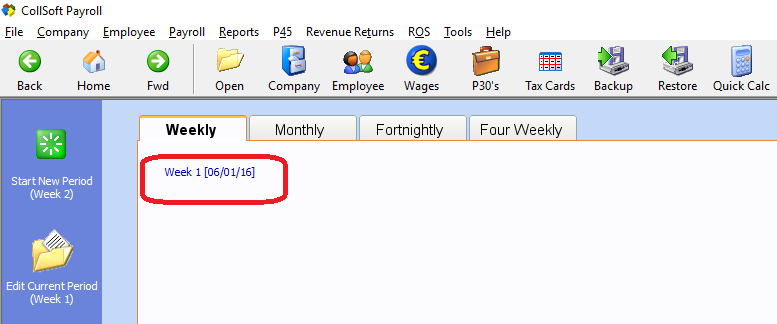
Once all payroll entries are complete for the pay period simply Close the Wages listing.
Once the pay period displays in the pay period listing this pay period is now complete and closed.
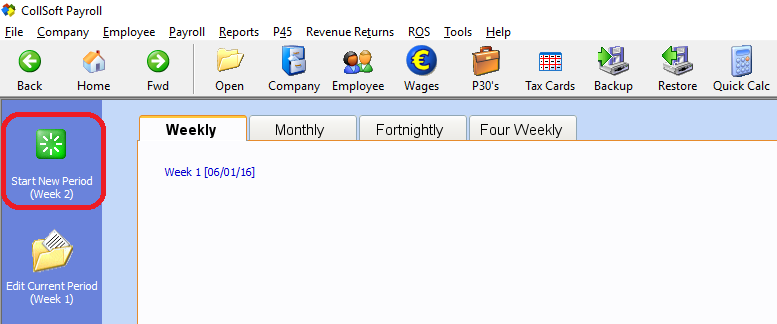
As each period closes the function to begin the subsequent pay period will display on the sidebar.
The payroll is now complete for the period.
Step 1
Create New Company
In CollSoft Payroll, everything begins with a Company. You must create a Company before you can commence setting up employees and/or processing payroll.
In creating a Company you must set the master details by which the Company will operate payroll as a whole, for example, the normal business address of the employer, the bank account from which payroll will be paid, the standard set of additions and deductions, the varying cost centres (if any) etc.
At any time the company settings can be amended/updated by returning to the Company menu. At each employee level, these company level settings can be amended to suit the particular employee payroll requirements.
General Concepts: Add a new Company/Employer
Step 2
Add New Employee
Once the Company has been setup each employee record can be created. An employee record must be created before any payroll can be processed for that employee through CollSoft Payroll. An employee record can be amended at any time, for example, to update Revenue Details (tax credits, SRCOP, USC), change payment method, setup payslip email options etc.
The timing of employee amendments is very important to the correct operation of payroll. Employee amendments must be made prior to processing payroll for the period to which the changes must be effective from. Any changes made to an employee record will not effect previous pay periods which have already processed.
General Concepts: Setting up a new Employee
Step 3
Processing Payroll
Once the Company has been created and all employees have been added, the payroll or wages can be processed.
It is important that the initial pay period is set up correctly as this will affect each subsequent pay period and may create an issue at the end of the tax year if set incorrectly in the initial period.
‘Tax must be deducted or refunded in accordance with the tax credits and standard rate cut-off point due and the tax rate applicable at the time the payment is made. This is so even if all or part of it was earned or treated as earned in a previous or coming income tax year.’ Excerpt from Revenue Guide to Employers
Select the first normal pay day (as it would usually be) for the first payment in the payroll year. This must be the actual day of payment and not when the work was carried out.
‘Weekly pay should be regarded as paid on the same weekday throughout the year. For example, where the normal pay day is on a Friday but one pay day is changed to the previous Thursday, the following day (Friday) should still be regarded as the pay day for the purpose of determining the income tax week.’ Excerpt from Revenue Guide to Employers
Choose the income tax week in which the initial payment will be made. This must be the actual day of payment and not when the work was carried out. Refer to Revenue Tax Weeks and Months
CollSoft will automatically align the day and tax week entered to the appropriate income tax week based on the above week day and date entered.
General Concepts: Setting up the first pay period
Once the initial pay period is set, the first pay period will list the employees to be processed for that period.
General Concepts: Employee listing for the open pay period
Each employee's wage record is set to zero. You now have two options;
- Enter the wage details within the open pay period, or
- Auto-Process to copy forward the previous pay period payroll into the current pay period.
1. Enter the wage details within the open pay period
- Select the Employee by clicking on the employee name
- The period payroll file for the selected employee will display
- The default pay details, as per the employee record, will be auto-populated.
- Amend the payroll figures (basic pay, additions, deductions etc.) as necessary
- Save the amendments made
- Select Close to return to the employee listing
2. Auto-Process to copy forward the previous pay period payroll into the current pay period.
CollSoft Payroll offers a batch processing option called Auto Process. This function will process all the employee records in a batch, copying the payroll details processed in the previous pay period and applying them to the current pay period. For exceptions, it is possible to simply amend the individual employee payroll details for the period by simply selecting the employee from the listing (as detailed in Step 1 above), prior to selecting to Auto Process.
- Select Auto Process
- The previous pay period will display, indicating the current pay period into which the payroll will be copied. Select Next to continue.
- All employees are listed.
- All employees will be selected by default. It is these selected employees, for whom the payroll details will copy forward.
- Any employee highlighted in red indicates a manual adjustment to the current pay period record, if you wish to process the amended figure then do not select these employees for auto process.
- Select Next to continue with the list of selected employees
- Select Finish to complete the auto process task.
Once all payroll entries are complete for the pay period simply Close the Wages listing.
Once the pay period displays in the pay period listing this pay period is now complete and closed.
As each period closes the function to begin the subsequent pay period will display on the sidebar.
The payroll is now complete for the period.

 Get help for this page
